
 Khmer (Cambodia)
1. Introduction
The following objects can be exchanged:
Library items
- Calendar
- Unit
- Account Items
- Resource items
- Code library
- Task template (Only from TILOS to Primavera as code library)
- Mission
- Link
- Planned resources
- Estimated cost
- Assign code
This is an exchange between two different applications that use different data and management models. This document will provide some help to get the best out of your exchange.
TILOS has more job calculation options than Primavera. Exporting a profile-based task to P6 and vice versa will result in the calculation being overwritten by the import and no longer existing in the task. The same applies to distance-specific alignment options in TILOS.
In any case, it should be the main program where major edits are made. This can be applied to part projects. For example, in a major road project, linear tasks are planned in TILOS, while non-linear tasks are planned and managed in Primavera such as Bridges.
Linking is designed to move specific sections of projects where the filter is applied, or even to merge multiple projects in TILOS into the same Primavera project or vice versa.
2. Settings
The first step to connecting TILOS and Primavera is to install the Primavera API on your computer.
The calling mode for the database must be local. Remote mode is not supported.
After installing the API, you can test the API against pre-installed programs from Primavera. All sample programs are copied to the API folder and begin with the word Demo *. If these work OK, the connection should also work with the TILOS integration.
If there are any issues with the sample applications, contact your IT department or Oracle support.
3. Working Process
You do not need to install any separate program for the exchange between TILOS 9 and P6. You also don’t need any special configuration to control the data exchange parameters, as in the older version of TILOS. From now on, in TILOS 9 and later, you can easily export your saved project to a .XML file and select the portion of the schedule you want to transfer to another program. Here, we will describe in detail each step of exporting and importing data in both ways.
3.1 Pushing data from TILOS to Primavera
Step 1 : Start TILOS and open the file you want to push to Primavera.
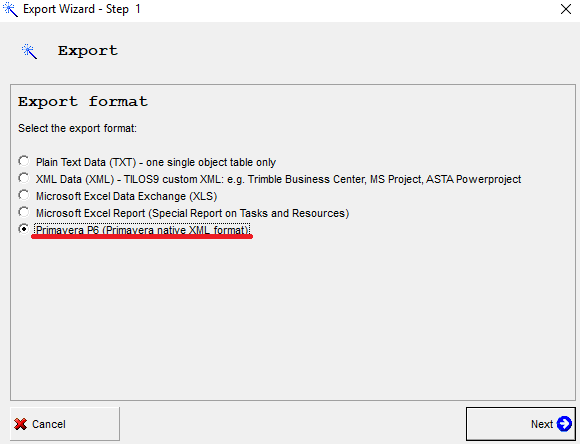
Step 2 : Choose from the Export File option instead of choosing from Primavera’s native XML export format and click next
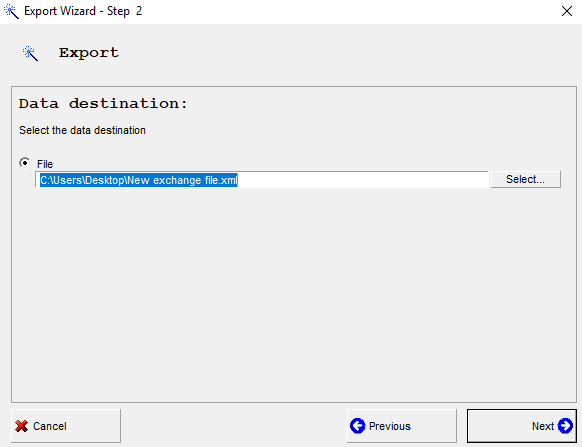
Step 3 : Then you need to select your spatial data destination where you want to place the .XML file. For example:
Step 4: In the next window, you need to select the data that you want to export to Primavera and the method you will use to export. You can do this with a User Defined Field (UDF) or with an Activity Code.
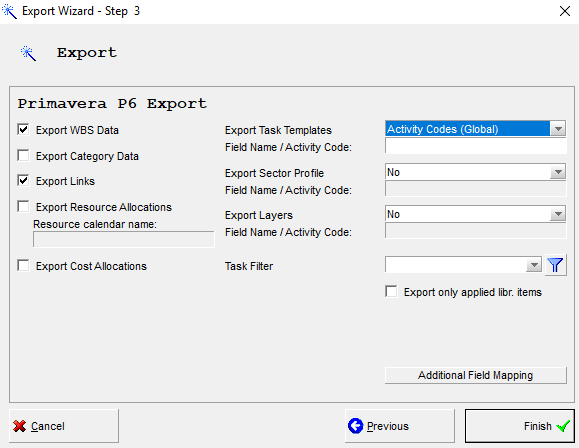
Step 5 : You can select the Task Filter that you want to use for export. If no filter is set, all task data will be exported. If you don’t want to use the Action Filter, go to Step 6.
Step 6 : Click Finish button to create the xml file
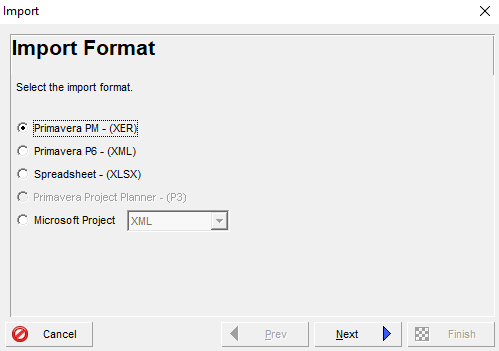
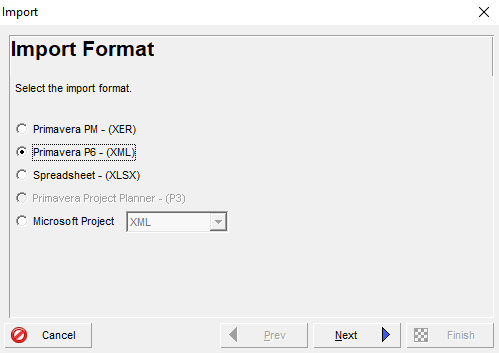
Step 7 : Go to Primavera and select the file to import. Next in the input format, select the XML format and click Next
Step 8 : Select the previously created .XML file and click Next
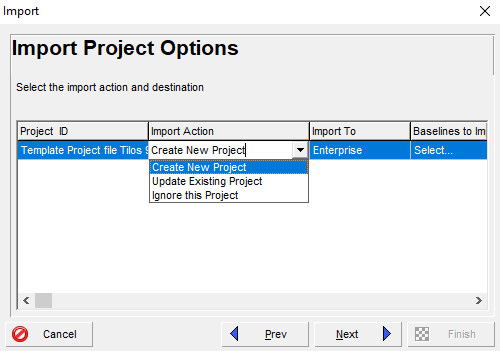
Step 9 : Select the project in Primavera that you want to import data into. The default project ID is obtained from the TILOS project ID if project information has been added to the data file. If you want to save it as a new project, just choose Create New Project.
Step 10 : Choose an input template. You can edit an existing template or create a new one.
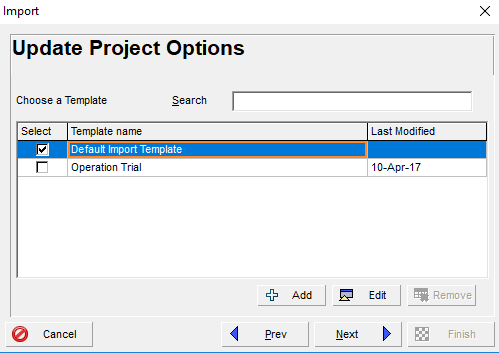
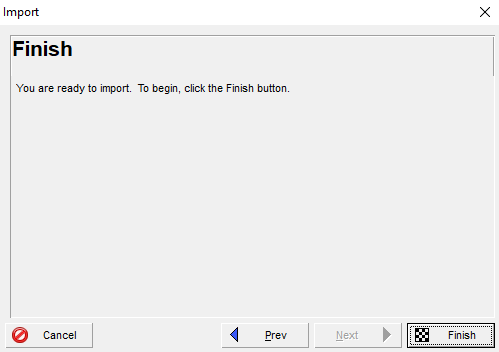
Step 11 : When you are ready, just click Finish and the project will import to P6
3.2 Transferring data from Primavera to TILOS
Step 1 : Start TILOS and open the project you want to export data to. There should be only one instance of TILOS running at this time. If more than one instance is running, the first found version will be used.
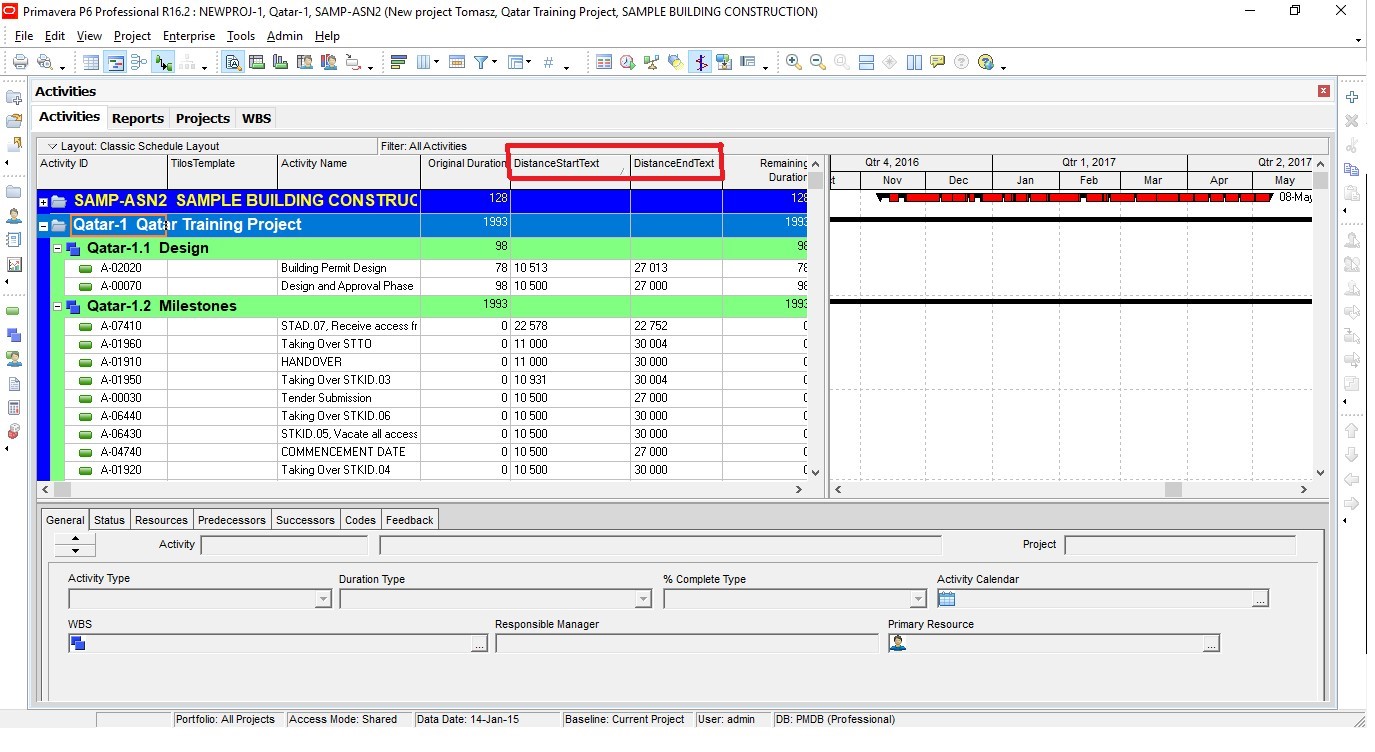
Step 2 : Run your Primavera. Remember that TILOS is a two-way program, except for time, they have a distance. P6 has only one dimension – time. So, before you start exporting data to TILOS, you need to add two extra columns in Primavera with start and end spacing.
Step 3 : Select File and Export
Step 4 : Same as previous step in Export Format choose .XML . format
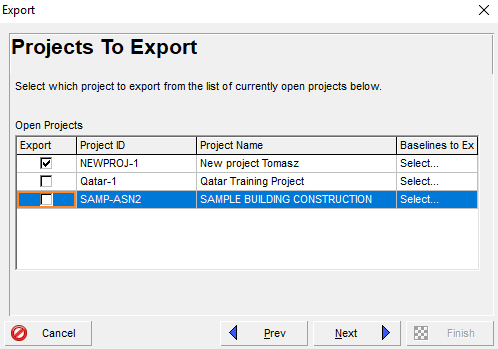
Step 5 : Now you need to select the project that you want to get the data to export.
Step 6 : Enter a filename and select the destination where you will save the .XML. Remember if you have selected Export all project level layouts, a .ZIP file will be created. Please uncheck this option.
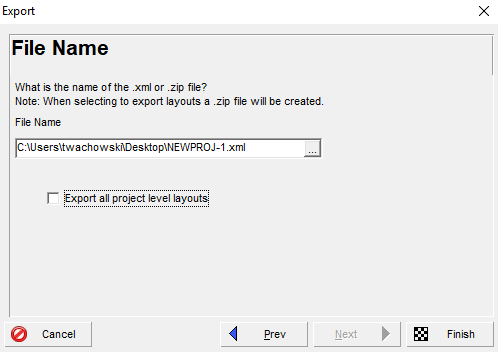
Step 7 : Click Finish to create the .XML.
Step 8 : Go to TILOS and select File and Import. Select the .XML format and select the file with the project from P6. Click next.
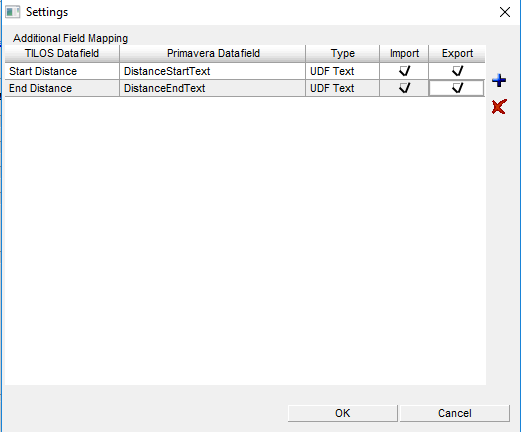
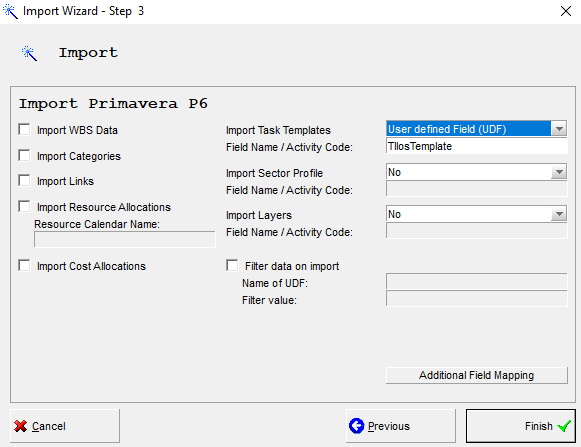
Step 9 : Select the data you want to import. Except for the standard option, click Additional Field Map. Here you can add the data you want to import or export. Add Two Column Settings with Start Spacing and End Spacing. You can add new fields using the plus button and delete using the red x button. It is important to remember that the names of the columns should be the same as in Primavera. When you’re done, click OK.
Step 10 : Click the Finish button to import the project in Primavera.
3.3 Exchanging mission data
As mentioned before, we have two ways to exchange the Task Template between TILOS and P6 – by Activity Codes and by using UDF.
Activity Codes : In Primavera, we can assign codes to our tasks. There are three types of code in P6 – Global, EPC and Project. We will not describe the difference between them, you just need to remember that we can use all of them to exchange samples.

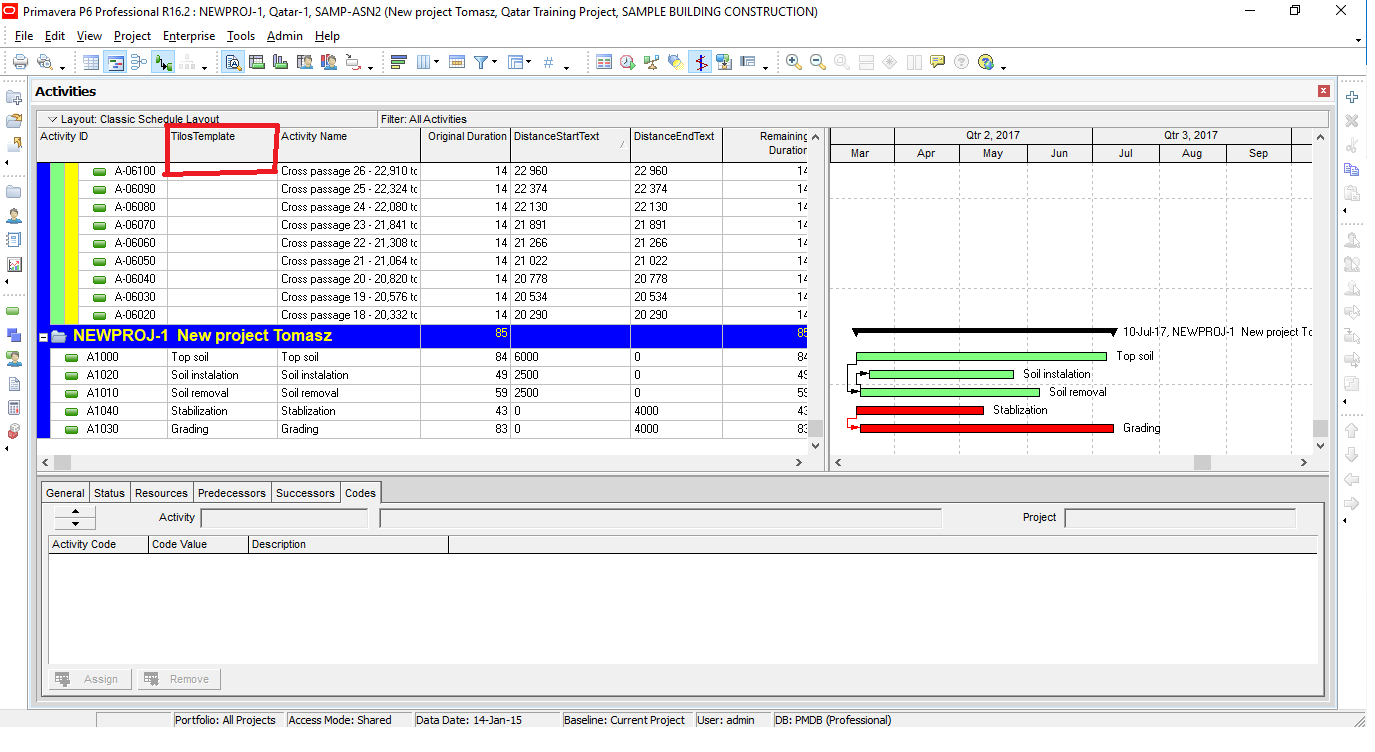
When you want to import/export form data TILOS you have to choose in Activity Codes option exactly the same codename as in Primavera. Here we recommend using task template name.
The second option is to use a UDF. In this case, we need to add a Primavera extra column (except for already existing extra columns with start and end spacing). This column is named as you like, but you must remember to use the exact same name in TILOS as Primavera. Here we recommend using the task template name.
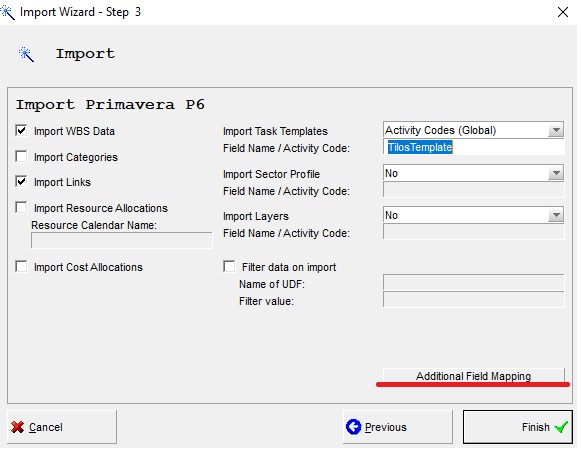
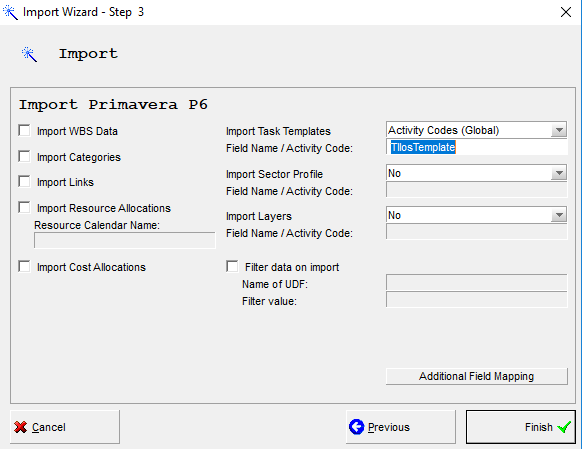
When you are given the method to use for exchanging tasks, select on the screen above the data you want to export/import. You can import/export WBS, Data Categories, Links, Allocated Resources, Cost Allocations, Region, and Layer Configurations
Below, is a listing of the columns with the field type. Yellow marking is the minimum for correct exchange. Remember that you need to have the same field names in Primavera and in the TILOS supplemental field map.
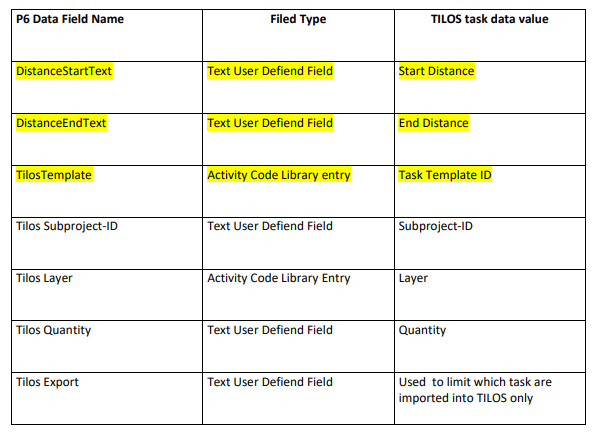
You can change the name of the field as you like.
4.1 Filters on TILOS Export
Exporting data from TILOS, you can apply a standard filter stored in your TILOS file.
This controls which tasks are exported.
The name of the filter applied will be stored in the profile. The filter itself is stored in the TILOS file.
4.2 Filters on Primavera Export
To export from Primavera, the filter definitions are stored in the TILOS file.
There are 3 types of filters:
- Activities
This filter allows the filtering of the activities to be exported. All active properties in the combo list can be used.
Not all operators can be used for all fields. For UDF codes and fields you can only apply validation filters because only in this case can you choose the activity and then the links.
Code assignment: IsAssigned, Equal.
UDF Text Field: Equal, Greater than, or Equal.
To get all tasks where the UDF field has been edited, use Greater than or Equal =! This is a very low character in the ASCII table, so all edited fields will be added to the filter result.
The value is entered directly in the value field.
Wildcard characters (*) are only supported when combined with the Like operator.
Please use % instead of *.
Many of the above filters act as “And”
- Codes
By default, no code libraries are exported. Only those nominated in the code filter list. Each Code filter line is independent. They work like or.
- Resources
In general, all used resources are exported if we choose to export resources.
However, filter usage may include a user-defined field that allows only specific resources to be displayed in TILOS.
The condition is the same as for Activities.